
Making
Safe Drinking Water for Life!
The
Solar Kangaroo™
The first system I will discuss is the solar kangaroo which I invented and tested in my backyard (Pearl River, LA, USA) beginning in March of 2010. The kangaroo is designed to kill harmful waterborne germs through pasteurization (heating 150° F, 65° C for one hour) in naturally contaminated water (1). This does NOT include chemically contaminated water, seawater or brackish water. Also, the kangaroo is NOT a filter or purification system. Water should be reasonably clear and free of sediments and debris. However, turbid (cloudy, brown) water may be used when nothing else is available. Turbidity will not affect the tools’ performance. The solar kangaroo is a simple, inexpensive, and reliable system for pasteurizing naturally contaminated water - making it safe to drink. On a sunny day with temperatures above 70° F (21° C), one kangaroo unit can pasteurize to 2 - 4 liters. Two liters/day is the recommended drinking allowance for healthy adults. The kangaroo is efficient and highly compact, with dimensions of 14 x 16 x .15 inches, it can be stored flat in large stacks. Each kangaroo system can be hand-made in 20 minutes at a cost of under $4 in materials. Basically, the kangaroo works by using the sun to heat a water container inside a clear plastic pouch that includes a parabolic trough for focusing and reflecting sunlight onto the water container. The black color of the water container acts like a light magnet absorbing all available light striking its' surface. The containers' molecules are excited by the photons that make up the light resulting in heat that is transferred to the water. Finally, the clear plastic pouch helps to retain heat by promoting a greenhouse effect and preventing heat loss due to wind and air temperature. It is a simple, self-contained solar cooker. Like a mother kangaroo, the system consists of a cradle, pouch and a joey (baby kangaroo). A flexible parabolic solar trough (cradle) fits inside a clear plastic bag (pouch). A filled black water bottle or bag (joey) is centered, lengthwise, flat on the cradle inside the bag, the cradle is manually shaped into a parabolic trough and the bag is sealed. Finally, the kangaroo is placed flat in the sunlight and positioned east to west for about 4-5 hours or until the water temperature reaches at least 150° F (65° C) for one hour. Always use a thermometer WAPI or SPADE to measure water temperature and avoid heating beyond 160° F (71° C). Once temperature reaches 160° F, you only need 15 seconds to kill all harmful waterborne germs. No additional turning or handling is required. After which, the water is pasteurized and safe to drink (hot or cooled) or stored for later use. If the bottles are kept unopened after treatment and stored in a cool, dark place, they can be stored indefinitely. Dead pathogens cannot reproduce. The only things that may grow are algae. However, these are not a threat. Steps for making a Solar Kangaroo™ Materials (brands in parenthesis) All these materials may be purchased in the USA at most large hardware stores and supermarkets. I found everything between Loews hardware, Walmart and Office Depot. 12 inch roll of self-adhesive HVAC duct insulation (Frost King at Loews) 12 inch roll of heavy duty aluminum foil (Reynolds at Walmart) 18 inch roll of self-adhesive clear plastic contact paper (Con-tact at Walmart) Roll of black duct tape (Shurtape, Duck tape at Loews) Black spray paint for plastic (Krylon Fusion at Walmart) One clear 2.5 gallon food storage zip bag (Hefty at Walmart) One clear 1 gallon food storage zip bag (Hefty at Walmart) One small binder paper clip ( at Office Depot). Tools Scissors (for cutting) Yard stick (for measuring) Liquid or meat thermometer, WAPI or SPADE (for measuring water temperature) Step 1 - Making the Cradle The solar cradle is vital for reflecting and focusing the suns' energy to generate heat. Properly constructed and maintained, the cradle should last years. First, make 'aluminum canvas' by cutting a 12 x 14 inch strip of aluminum foil and laying a 12 x 14 inch strip of clear contact paper onto the 'shiny' side of the aluminum foil. Press the two layers together and smooth out with your hand. Remove any air bubbles by pricking them with your scissor (or other sharp point) and flattening with your finger. The result is a tough, tear resistant sheet of aluminum foil that is protected from wear and water. Second, make the cradle by cutting a 12 x 14 inch strip of self-adhesive HVAC duct insulation. Next, press the 'dull' side of the aluminum canvas onto the adhesive side of the insulation to form the reflector. The result is a tough, lightweight and flexible parabolic solar trough. Step 2 - Making the Pouch The pouch must be a clear plastic bag that allows sunlight through and traps the heat in a greenhouse effect. The bag also prevents heat loss due to wind and air temperature. I prefer Hefty brand 2.5 gallon zip storage bags. One bag should last at least a month. After many uses I found that I needed to manually close the zipper opening shut, but the pouch still was useable and clear. Just remember to check the seal whenever you zipper shut. Place the cradle inside a clear 2.5 gallon food storage zip bag. You may need to fold the cradle slightly to fit into the bag opening. Manipulate the cradle so it lays flat inside the bag until you are ready to shape it into a parabolic trough. Step 3 - Making the Joey The joey may be either a bottle up to 2 liters or a specially constructed gallon water bag made with food grade plastic and black duct tape as described, below. Make a 'joey' water bag by pressing strips of back duck tape onto the outside of a one gallon food storage zip bag. Begin with vertical tape strips folded along the three seams of the bag followed by horizontal tape strips on both sides of the bag. Make sure not to cover or block the opening and zipper. Overlap the tape strips so that the bag is completely covered in black tape. Add more tape strips folded along the three seams for added strength. The result is a tough, tear resistant and reusable water bag. The bag (unlike a bottle) can be stored flat with the kangaroo and is lightweight and easily filled with water from a stream, well or other larger water container. Moreover, in a pinch, the bag can be used for solar heating and cooking of food including MREs (meals-ready-eat). When using this joey, fill the bag about half way. This will give you about 2 liters. Fold and press the bag to let most of the air out before closing the zipper. Then, roll the excess bag liner top down to compact it. Then, use a small binder clip to hold down the excess bag and keep its' compact shape. OR Recycle a clean food-grade bottle made of either plastic, metal or glass. The bottle should be no larger that 14 x 4 inches. I found that 2 liter soda bottles are ideal. The bottle needs to be either painted or taped completely black. I found that black duct tape works best, but a quality black paint for plastics is good too. Nonetheless, with every kangaroo I include a reusable black thermal blanket. The thermal blanket can be used with any allowable bottle and simply involves rolling a filled bottle up snuggly with the blanket and placing the wrapped bottle (joey) inside the kangaroo pouch. The blanket is made with a 12 x 18 inch sheet of heavy-duty aluminum foil that has the dull side covered with black duct tape. Bottles wrapped in the thermal blank take a little longer (up to an hour) to heat, but imagine the cost savings with not having to tape or paint every bottle! When filling plastic or metal bottles it is important to fill them almost to the top. You want about 1/4 inch air space beneath the bottle cap. This will keep the water bottle from melting and imploding from the heat while allowing some room for heat expansion. Glass and metal bottles will get hotter, quicker. So monitor glass/metal closer and try to use plastic when you can. Remember to securely cap or cork your bottles. When opening HOT bottles, do so SLOWLY as the water will try to erupt from the top. Please use caution! My Vision for the Kangaroo The kangaroo is so easy - even a child can do it! My hope is that the 'kangaroo' metaphor will help children warm to the idea and use this tool to make their water safe. Perhaps someone will publish a coloring or comic book to illustrate this tool for children. Picture a cute joey in momma's pouch handing a bottle of safe water to a thirsty child. I'm freely giving this DIY tool to anyone concerned with the safe water crisis. The kangaroo is so simple that I have not bothered to patent it in any way (nor should anyone else). My hope is that volunteers from churches, schools, charities, social clubs, scout troops, and relief organizations would come together to build kangaroos for those in need who cannot build them for themselves. Ideally, those in need would be trained to build the kangaroos for themselves. When you see the kangaroo in action, you'll appreciate the ability this tool has for relief and empowerment. |
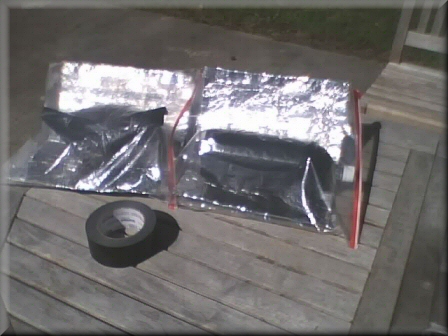
 Figure 1A. Solar Kangaroo water pasteurization tool.  Figure 1B. Solar Kangaroo components (from left to right) - Cradle, Pouch, and Joey (bag, blanket).  Figure 2. Materials and tools used in making a Kangaroo. 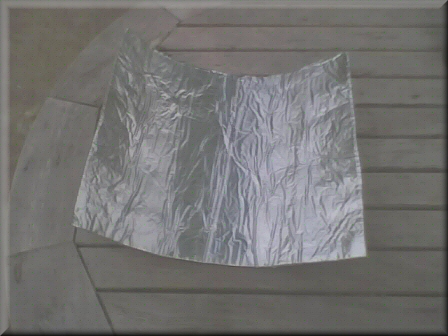 clear plastic contact paper.  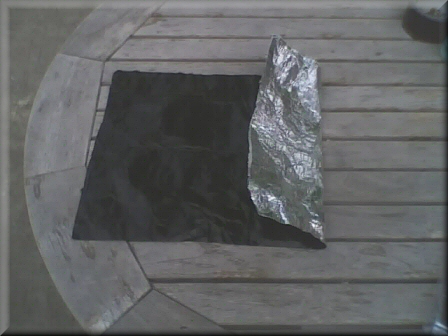 Figure 5. Black thermal blanket
for wrapping bottle joeys.
 Figure
6. Kangaroos grazing in the sunlight
|

![]()